What is the Preferences tool?
In My Workspace, you can set preferences for which sites appear in your navigation and which sites have their own tabs. You can also choose how often you receive email notifications of site activity, set your time zone, and select your language.
Go to Preferences.
Select the Preferences tool from the Tool Menu in My Workspace.
Customize tabs.
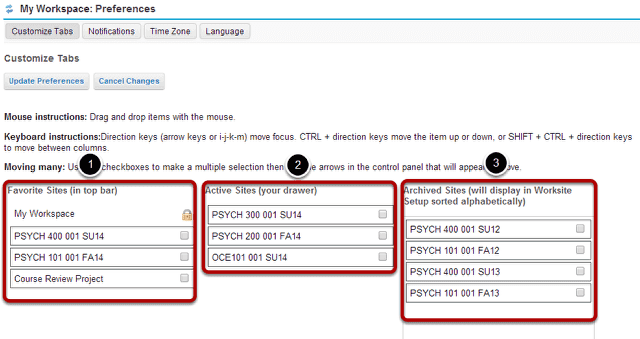
When you first enter the Preferences tool, you will be taken to the Customize Tabs information. On this screen, you can choose which sites are displayed as tabs in your navigation and active sites, and in what order they appear.
- Favorite Sites: This list of sites appears on the left side of the screen. These are the sites which display as tabs in the top navigation bar of the system.
- Active Sites: This list of sites appears in the middle of the screen. These are the sites which display in your site drawer when you click on More Sites in the top navigation bar.
- Archived Sites: This list of sites appears on the right side of the screen. These sites will show up in your list of all enrolled sites in tools such as Worksite Setup and Membership; however, they do not appear in the top navigation bar or in your site drawer.
Note: Archived Sites are still active in the system, are still available to other enrolled users regardless of individual site display preferences.
Moving a site with drag and drop.
You can use drag and drop to rearrange the order in which your sites appear, or move sites into or out of the favorites, active, or archived site lists.
Click on the site you want to move and then and drag it into the new location and release to drop it in place. (The color of the item and new location will change to green while you are dragging the item.)
Moving a site with the keyboard arrows.
You can also move sites using the keyboard arrow keys. Select the site you want to move, and then use CTRL + the direction keys (arrow keys or i-j-k-m) to move the item.
Note: The item currently selected will have a bold outline.
Moving multiple sites.
If you would like to move several sites at once, you may also select more than one item by checking the boxes nest to each of the sites. A control panel with direction arrows will appear. Click on the direction arrow button to move the selected sites in the desired direction.
Select tab format.

You may also choose how you would like courses to be displayed in the tabs across the top. Select either the Course code or Course name/description radio button for your preferred format.
Click Update Preferences.
Once you have finished making changes to your sites and tabs, click Update Preferences to save your changes.
Notifications.

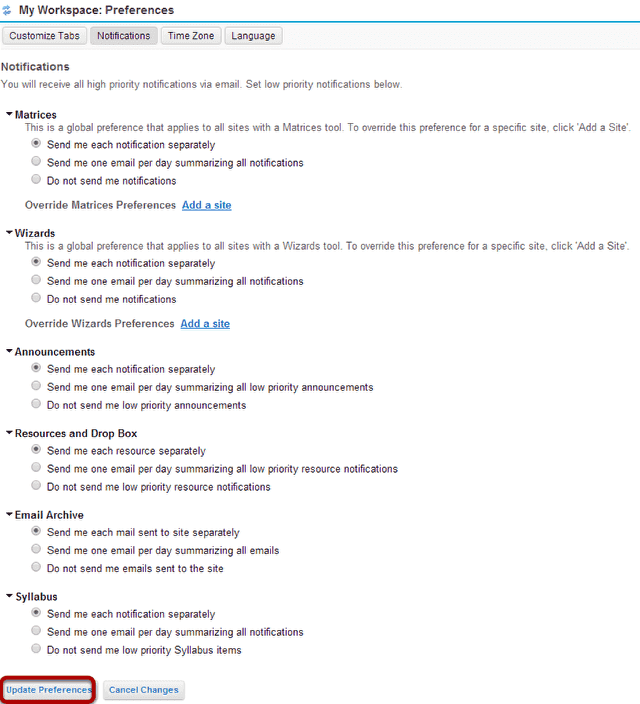
To customize your notification settings, click the Notifications button.
Select notification preferences.
You may choose from the following three options for low priority email notifications in the Matrices (OSP), Wizards (OSP), Announcements, Resources and Drop Box, Email Archive, and Syllabus tools.
- Send me each notification separately. (Default setting)
- Send me one email per day summarizing all notifications.
- Do not send me notifications.
If you change any of these settings, click Update to save your changes.
Note: These settings only apply to low priority items. High priority items will still be sent via email regardless of your settings here.
Time Zone.

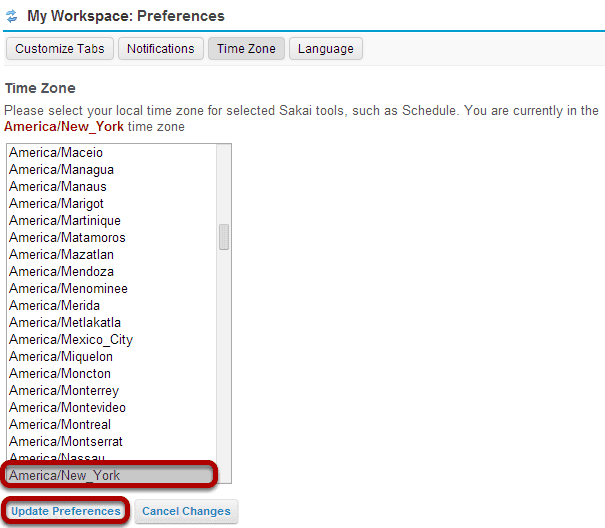
To set your local time zone, click the Time Zone button.
Choose your time zone.

Select your local time zone from the list, and then click Update Preferences.
Language.

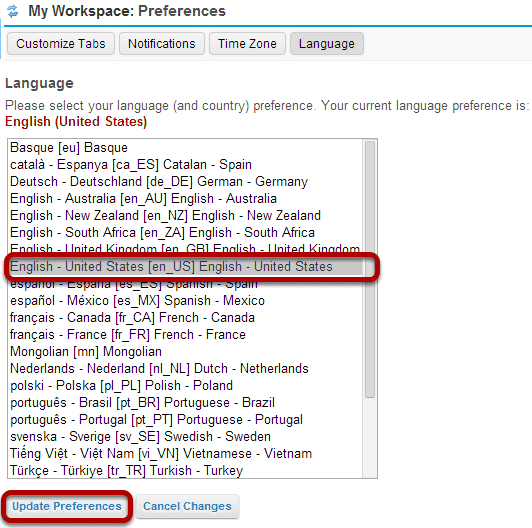
To set your preferred language, click the Language button.
Choose your language.

Select your preferred language from the list, and then click Update Preferences.


